Page 1 of 5
Ryan's Stowable Scanner Build Thread
Posted: 10 Jan 2011, 22:46
by Ryan_phx
Well, it's time to jump in and start making sawdust. I have two cameras in the mail (A480s, $55/each), and pretty much everything else is waiting in the garage. With any luck, I'll start the build on Wednesday. The idea is to make a scanner that is stowable--not portable, not collapsible, but stowable. The base will double as the storage case, and everything should be able to disassemble and fit inside the base, which should be able to fit under the bed or the desk, or get stashed in the closet. I should be able to assemble/disassemble it in just a few minutes. I'll need a screwdriver for a couple of clamps, but I'm just going to put a small cheap one in the case so I won't have to worry about finding one. With the exception of the cameras and a few pieces of hardware, it will be built entirely from what I have on hand, mostly 1/2" Baltic Birch plywood.
I still have a couple of questions regarding lighting that I hope someone will help with. First, roughly how far above the platen should the lights be mounted to minimize glare? I'm currently planning to use floodlights (the kind Daniel used in the "New Standard Scanner"), but I haven't bought them yet, and I'm willing to rethink that. I liked the idea of LEDs (because the floodlights won't fit in the case), but I'm not sure I totally understand how they're put together. Do I just take a battery holder, wire it to the BuckPuck, then wire the LEDs in sequence? I read
this thread, but I feel like I'm missing something. If I use LEDs, does the mounting height change?
I would appreciate any and all advice!
Thanks,
Ryan
Re: Ryan's Stowable Scanner Build Thread
Posted: 10 Jan 2011, 23:11
by daniel_reetz
Hey Ryan,
The exact distance of the lights above the platen is something that's easy to figure out after you've built the base - just lift up the floods until they don't appear in the camera image anymore. I'm sorry to say I've never done the math on that. If anyone else has info, I'd be glad to hear it. You could also take measurements from the New Standard, it works as described.
As for LED lighting, I just received two BuckPucks and need to hook them up in the next day or two. So if you can wait a few days, I'll have a wiring diagram and how-to that's a lot better than the previous stuff I've posted. If you can solder (and even if you can't solder yet) BuckPucks are a great way to go. LED lighting is pretty sweet, though it's not as cheap and powerful as halogen. You can always start with the halogens and then move to LED later.
Stowable is a great concept, it should have fewer problems than my portable builds. I'm excited to see what you come up with.
Re: Ryan's Stowable Scanner Build Thread
Posted: 10 Jan 2011, 23:43
by reggilbert
Ryan_phx wrote:First, roughly how far above the platen should the lights be mounted to minimize glare?
The people who received Daniel's latest build tried to figure this out and determined that the LED lighting provided with that machine needed to be 55 inches above the table they were using. Pic and comment in the fourth post of
this thread page. However, Daniel says that scanner is larger than normal, so presumably the needed height would be less for a regular-sized scanner.
Re: Ryan's Stowable Scanner Build Thread
Posted: 11 Jan 2011, 00:13
by Ryan_phx
daniel_reetz wrote:Hey Ryan,
The exact distance of the lights above the platen is something that's easy to figure out after you've built the base - just lift up the floods until they don't appear in the camera image anymore. I'm sorry to say I've never done the math on that. If anyone else has info, I'd be glad to hear it. You could also take measurements from the New Standard, it works as described.
As for LED lighting, I just received two BuckPucks and need to hook them up in the next day or two. So if you can wait a few days, I'll have a wiring diagram and how-to that's a lot better than the previous stuff I've posted. If you can solder (and even if you can't solder yet) BuckPucks are a great way to go. LED lighting is pretty sweet, though it's not as cheap and powerful as halogen. You can always start with the halogens and then move to LED later.
Stowable is a great concept, it should have fewer problems than my portable builds. I'm excited to see what you come up with.
I can certainly wait for a good how-to, thanks. I'm only going to have a few hours at a time on maybe 2 or 3 days a week to work on this. I'm starting with the platen, then I'll index all of my other measurements off of that. The light stand will probably be the last component to be built, and at the rate I'm going, it'll be Labor Day before it's done! I do have a soldering gun--I'm not good at it, but I can do it.
Re: Ryan's Stowable Scanner Build Thread
Posted: 11 Jan 2011, 00:16
by Ryan_phx
reggilbert wrote:Ryan_phx wrote:First, roughly how far above the platen should the lights be mounted to minimize glare?
The people who received Daniel's latest build tried to figure this out and determined that the LED lighting provided with that machine needed to be 55 inches above the table they were using. Pic and comment in the fourth post of
this thread page. However, Daniel says that scanner is larger than normal, so presumably the needed height would be less for a regular-sized scanner.
55" seems a long way. I wonder if some kind of diffuser would let me bring it lower? I'll have to experiment when I get to that point.
Re: Ryan's Stowable Scanner Build Thread
Posted: 11 Jan 2011, 09:53
by daniel_reetz
It absolutely does not need to be 55 inches on a normal scanner. I cannot emphasize enough how
different that scanner was from a normal build. It was enormous. Entire New Standard Scanners could fit inside it. It was also portrait orientation, to capture ledger-style books, instead of landscape, which greatly exaggerated the height problem.
I built a scanner that fits in carry-on luggage with LED lighting, which probably had the shortest lighting-to-platen distance of any scanner shown on this forum. In fact, thinking about it, you can probably just download the 3D model that Dario DeMoura made of it, and measure that. The 3D model and information are here:
http://www.diybookscanner.org/forum/vie ... =120#p3346
Whatever that distance is, it's probably close to floor.
The distance is a combination of four factors:
The angle of the cameras to each platen face (ideally they are normal to each platen face)
The distance of the cameras to the platen face.
The size of each platen face.
The total area presented by the lighting surface (so a large light VS a tiny LED will provide a larger glare image).
As you can see, it's easier just to try things in this particular instance.
Re: Ryan's Stowable Scanner Build Thread
Posted: 12 Jan 2011, 11:08
by daniel_reetz
So, I am still going to show how to actually solder things together, but while actually soldering things together last night, I realized just how good the
buckpuck datasheet is. Everything you need to know is in there - I can help explain it, though, wherever it is unclear.
And BTW, I am not using batteries - I am using a 15V AC adapter for my 4 Cree Q5s. If you went to 3 Cree Q5s, you could get down to a 12V adapter, which is free in the junkpile or
$1.89 on eBay. Might pay to look around the junkbox though as the supplies that come with laptops and the like are usually a bit more sturdy.
Re: Ryan's Stowable Scanner Build Thread
Posted: 12 Jan 2011, 18:27
by Ryan_phx
daniel_reetz wrote:So, I am still going to show how to actually solder things together, but while actually soldering things together last night, I realized just how good the
buckpuck datasheet is. Everything you need to know is in there - I can help explain it, though, wherever it is unclear.
And BTW, I am not using batteries - I am using a 15V AC adapter for my 4 Cree Q5s. If you went to 3 Cree Q5s, you could get down to a 12V adapter, which is free in the junkpile or
$1.89 on eBay. Might pay to look around the junkbox though as the supplies that come with laptops and the like are usually a bit more sturdy.
So an old laptop power supply that outputs at least 15V will work? I never would have thought of that.
I'll be looking forward to seeing your design, even though it'll be quite a while before I get around to building mine.
I did get the platen built today, but it'll be at least Monday, maybe next Thursday before I can do any more on it.
Re: Ryan's Stowable Scanner Build Thread
Posted: 21 Jan 2011, 18:24
by Ryan_phx
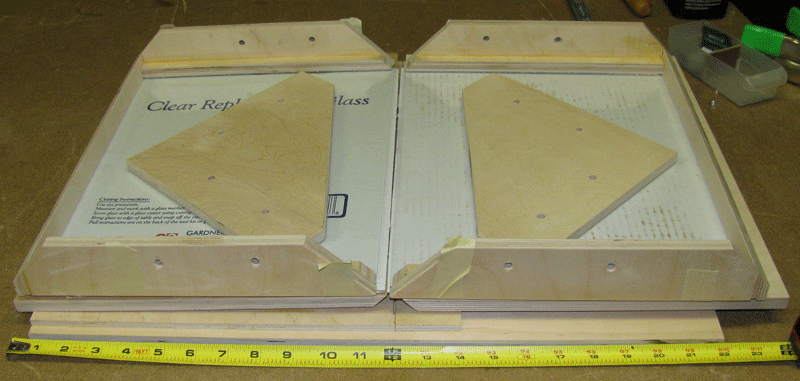
I got the movable base and cradle built today, and the platen has been done for about a week, so I thought I'd post a few pics. Next step is finishing the main base/case and adding the platen lift/lightstand.
Cradle:
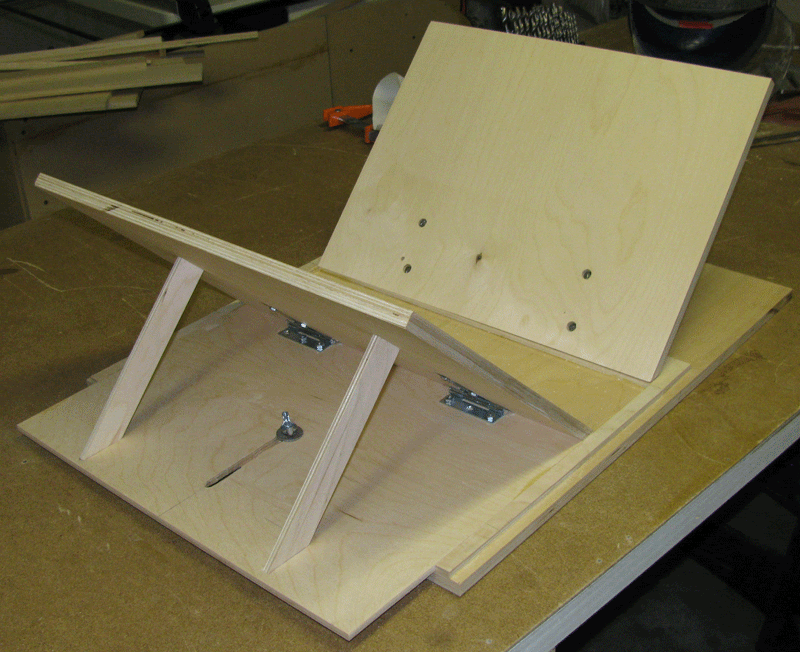
Cradle with platen:
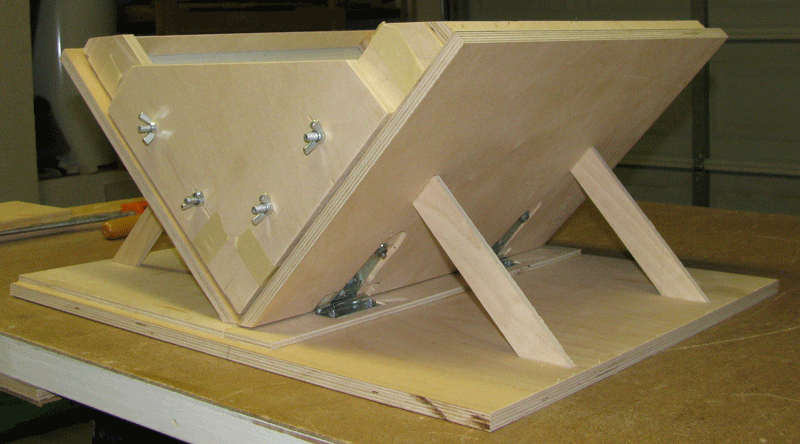
In stowed position:
Another stowed position shot:
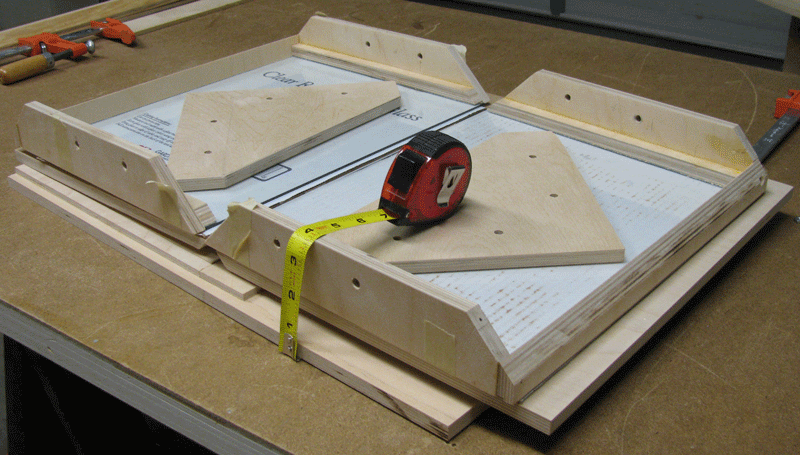
The cradle supports are mortised into the cradle rest and the base--they'll stay in place, but can easily be lifted out of the mortises to be stowed. The glass is attached with double-sided outdoor mounting tape. I've used this stuff before on other projects, and it's very strong. When flattened out for stowage, the cradle and platen are less than 3.5" thick. When the platen lift/light stand and camera supports are added it will still fit under the bed. The case itself, which I started on today, will measure about 17x25x6.5".
Re: Ryan's Stowable Scanner Build Thread
Posted: 21 Jan 2011, 18:57
by Ryan_phx
The next step, which I probably won't get to until next Thursday, is to get the rollers attached to the case. In another thread, Daniel used rollers on two threaded rods that spanned the base to allow the cradle to move side-to-side. I'm doing something similar, but without the rods. I've got 4 brass rollers designed for sliding doors, and I'm going to attach them directly to the inside of the case with bolts and washers. They'll spin freely, and there won't be any rods taking up space in the case. I think in Daniel's design, the rods actually helped stabilize the base, but I don't need that reinforcement, so no rods for me.
Then I'll build the platen lift and lightstand. That'll be easy--one 3/4" piece of BB ply, a few bolts and wing nuts, a drawer slide, and a couple spacers. Once that's done, the camera supports (I have a clever idea for this, but you'll have to wait to see!) will be next. Then, hopefully, the LED light system.